Ford 4000 Tractor User Handbook Manual
FOREWORD
We wish to conptulate you on your choice of th, new Ford Tractor. We are happy to have you as a customter and are confident that you will receive unequaled performance from your Ford Tmractor.
This manual has been prepared to acquaint you with the many features of your new Ford Tractor. Most of the information presented here is general and applies to both Series 2000 and 4000 All Purpose Tractors.
Many of the features covered in this manual are optional equipment on some models and standard on others. For further information on optional equipment and accessories, see your Ford Tractor and implement Dealer.
Read this manual carefully at your first opportunity and keep it in a convenient location for later reference. You will be particularly interested 10 the "break-in" instructions starting on Page 17, and the maintenance instructions starting on Page 39.
If at any time, you have a question or problem concerning your new tractor, remember that your Ford Tractor and implement Dealer is best qualified and equipped to serve your needs. With the proper treatment and service. your Ford Tractor should provide you with a long life of profitable and dependable service.
SAFETY PRECAUTIONS
Your Ford Tractor embodies alr the safety features consistent with good performance. Safety features alone, however, will not prevent accidents caused by carelessness. The following safety precautions are suggested to help prevent such accidents.
- Do not permit anyone to ride on the tractor with the operator.
- The operator should never leave the tractor seat when the tractor is in motion.
- Use care when operating on teep grades to maintain proper stability.
- Always drive tractor at speeds slow enough to in sure safety, especially when operating over rough ground, near ditches, or turning.
- Keep the tractor in gear when going downhill.
- Always shut off the engine when leaving the tractor.
- Make sure the brake pawls are set when the tractor. (4-speed and 5-speed transmission equipped tractors.)
- Always keep the tractor brakees in proper operating condition
- Do not refuel the tractor when the engine is overheated or running.
- Never run the tractor engine in a closed garage. Carbon Monoxide fumes, expelled from the exhaust system, are very dangerous and cannot easily be detected because they are odorless.
- Never install or remove the belt while the belt pulley is in motion.
- Never wear loose clothing when operating the belt pulley or power cake-off.
- Always pull from the drawbar. Pulling from the top link or rear axle is dangerous.
- If the front end tends to raise, check for proper weight distribution.
The Tractor end imnplememt Division of the Ford Motor Co. being a member of the National Safety Council is privileged to use the Green Cross to denet safety instrutins in operator's manuals.
TRACTOR MODEL AND SERIAL NUMBER
When ordering parts or requesting information from your Ford Tractor and Implement Dealer, always specify the Model and Serial Number of your Ford Tractor. The Model and Serial Number is located on the left front side of the transmission housing aod should be recorded immediately in the space provided below.
CONTROLS AND INSTRUMENTS
The controls on your new Ford Tractor are designed to help yon do more work with the greatest possible convenience and comfort. All are within easy reach and are simple to operate. The well-grouped instruments tell you, at a glance, whether the engine is operating efficiently and warn you of the possibility of trouble before it becomes serious, Before attempting to start or operate your new tractor, familiarize yourself with the location and function of all controls and instruments.
CONTROLS AND INSTRUMENTS
TRACTOR SEAT
Take your place in the tractor seat. If the seat is not in the most comfortable operating position, it may be moved forward or rearward as desired. The seat pan may be tilted back, permitting the operator to stand. Series 4000 All Purpose Tractors are equipped with a cushioned eat which may be ad justed to accommodate the weight o! individual operators. The seat pan should always be tilted back when not in us to protect the cushion from dew and rain.
LIGHT SWITCH
The tractor lights ace operated by means of a switch on the lower right side of the instrument panel, just below the side panel. Pull the switch out to turn the lights on.
KEY SWITCH
The Key Switch is located on the lower left side of the instrument panel just below the side panel. Turn the key clockwise to turn the ignition "ON" for gas tractors, or to close the starting and charging circuit on diesel tractors. Turn the key counterclockwise for the "OFF" position.
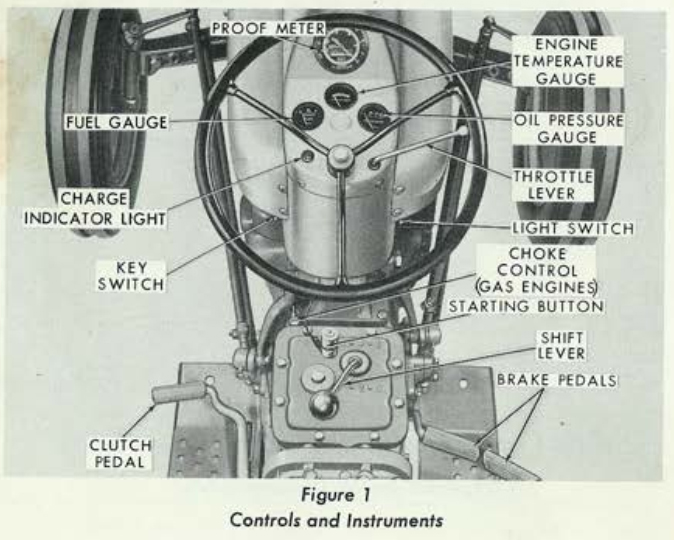
Figure 1 Controls and Instruments
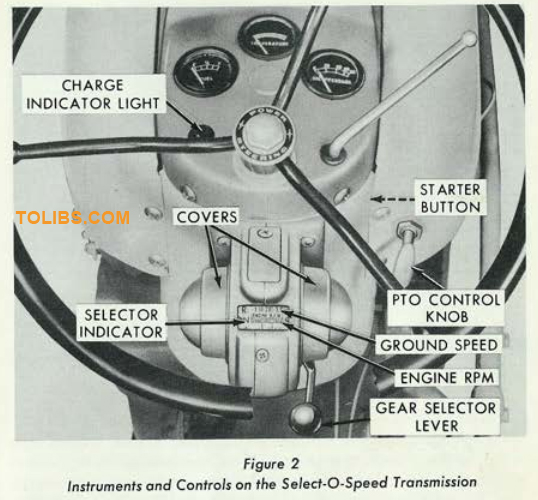
Figure 2 Instruments and Controls on the Select-O-Speed Transmission
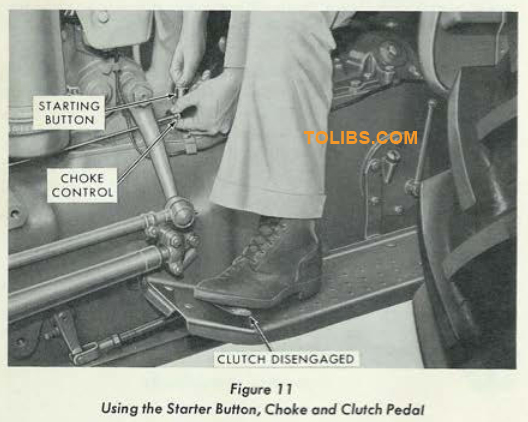
CHOKE CONTROL (Gas Models)
Initial starting may require the use of the choke control located at the left front edge of the transmission case. After the engine has been sufficiently warmed up, the choke control should be returned to its normal position as soon as possible.
GEAR SHIFT LEVER
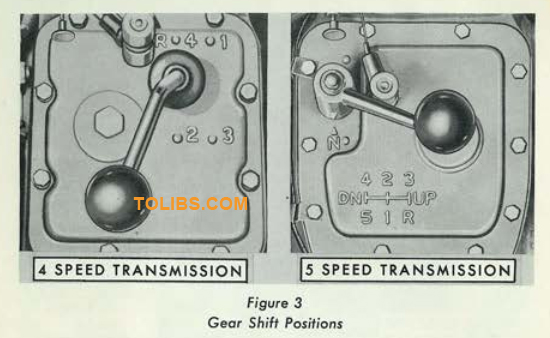
The 4-Speed and 5-Speed Transmission gear shift lever is 1located dkectly in front of the tractor seat or your convenience, a diagram of the shift positions is provided on the transmission cover as shown in Figure 3.
SELECT-O-SPEED SHIFT LEVER
The Select-0-Speed Transmission shift lever is located on the speed selector housing which is directly under the stetting wheel.
Gear Shift Positions
As the lever is shifted, a selector indicator, Figure 2, shows the gear selected.
SIARTER BUTTON
On 4-Speed and 5-Speed Transmission equipped tractors, a safety type starter button is located on the top of the transmission housing within easy reach of the operator. As a safety feature, the starter button will not start the engine until the gear shift lever is placed in the neutral (N) position.
On Select-0-Speed Transmission equipped tractors, the safety type starter button, Figure 2, is located on the underside of the hood panel, As a safety feature, the starter button will not start the engine until the shift lever is placed in the park (P) position.
THROTTLE CONTROL
The hand operated throttle control lever is located at the right side of the steering wheel column. Pull the lever to increase the engine speed Push the throttle past the detent to shut off the diesel engine.
OIL PRESSURE GAUGE
The engine oil pressure gauge indicates the oil pressure trough oil passages, but does not show the amount of oil in the crankcase. Oil in the crankcase can become dangerously low and still show pressure on the gauge. Check the engine oil dipstick, then check the pressure gauge periodically when openting your tractor to be sure that die lubrication system is operating satisfactorily.
TEMPERATURE GAUGE
The engine temperature gauge at the top center of the instrument cluster registers the temperature of coolant in the cooling system. Form the habit of checking this gauge frequenly. The green block indicates normal temperature, red indicates overheating and orange shows that the engin is operating at below normal temperature.
FUEL GAUGE
The fuel gauge indicates rhe fuel level when the key switch is turned on. Check this gauge frequently to make sure the foel supply is adequate.
CHARGE INDICATOR LIGHT
The generator charge indicator light will come on when the ignition switch is turned on and while starting the engine, After the engine starts and the engine speed is increased, the light will go out. The charge indicator light comes on if the generator is not supplying current to the battery.
CLUTCH PEDAL
On 4-Speed and 5-Speed transmission equipped tractors the foot operted clutch pedal, located on the left side of the transmission housing must be depressed to disengage the clutch. For information on the live P.T.0. clutch (Tractor Models 21202 aod 41202) see "Power Take Off Operation" on page 27.
INCHING PEDAL
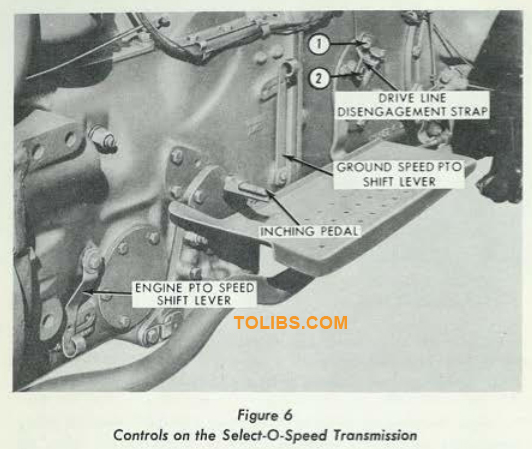
On Sclcct-O-Speed Transmission-equipped tractors a foot-operated inching pedal, Figure 6, allows you to case into implements when attaching them, and can he used for quick disengagement of power to the rear wheels.
BRAKE PEDALS
Foot-operated brake pedals are provided on the right side of the transmission housing. To scop [he tractor, depress both pedals simultaneously. Apply the right brake when making short right turns, and the left brake when turning left.
CAUTION: When operating the tractor at high speeds, never attempt to make sharp turns by using the brakes.
BRAKE PEDAL LOCKS
All 4-spced and 5-spetd transmission-equipped tractors are equipped with brake locks, located on the right and left sides of the rear axle housing, The brake locks should always be set before leaving the tractor. To lock either brake, first depress the right or the left brake pedal and pull upward on the corresponding brake control rod to engage the brake pawl. Release the brake pedal slightly while holding the control rod upward. See Figures 4 and 5, To release either brake, depress the desired brake pedal sharply. This will permit the spring-loaded brake control rod to disengage the brake pawl from the brake lock.
P.T.O. LEVER
On 4-Specd and 5-Speed transmission-equipped tractors, the P.T.O. is engaged when the lever is in the rear position (see Figure 5), and is disengaged when the lever is forward. Always depress the clutch pedal when engaging or disengaging the P.T.O, while the tractor engine is running.
P.T.O. CONTROL KNOB
On tractors equipped with the Select-O-Speed Transmission, the P.T.O, control knob is conveniently located in front of thy operator as shown in Figure 2. Slowly pulling the knob outward permits gradual engagement of the P.T.O. shaft to ease into loads. The P.T.O is "independent" which means that it can be engaged or disengaged while the tractor is either moving or stopped. The ground speed P.T.O. shift lever must be in the disengaged or "OFF" position to pull out the P.T.O. control knob.
ENGINE P.T.O. SPEED SHIFT LEVER
Two engine P.T.O. speeds are available with the Model 41207 tractors. When the P.T.O. speed shift lever, Figure 6, is in the forward position, the P.T.O. shaft turns at the standard A.S.A.E. speed of 540 rpm. When the speed shift levee is in the rear position the shaft turns at 1000 rpm. Both P.T.O, speeds are obtainable at 1750 engine rpm.
GROUND SPEED P.T.O. SHIFT LEVER
The proportional ground speed P.T.O. is available with a Model 41207 tractor. Move the ground speed P.T.O. shift lever, Figure 6, to the forwatd position to place the shaft in operation. To disengage the shaft, move the lever back into [he "OFF” position. The P.T.O. control knob on the dash must be pushed in before selecting ground speed P.T.O.
DRIVE LINE DISENGAGEMENT STRAP
To tow or push a Select-O-Speed Transmission-equipped tractor, when the engine is not running, the drive line must be disengaged from the rear axle. This is necessary as the Select-O-Speed Transmission automatically "locks up” in park (P) whenever the engine stops. Operation of the disengagement strap, Figure 6, is described on page 24 of this manual.
HYDRAULIC SELECTOR LEVER
The Hydraulic Selector Lever under the tractor seat changes the hydraulic system from Constant Draft to Implement Position Control, Place the lever in the down position for Constant Draft Control, and in the up (horizontal) position for Implement Position Control. See Figure 7.
HYDRAULIC LIFT CONTROL LEVER
The lift control lever, which controls the hydraulic system, is the large lever to the right of the tractor seat, Figure 7. To raise the lift arms, raise the lever to the top position. To lower the lift arms, push the lever to the lower position.
FUEL SHUT-OFF VALVE
To shut off the flaw of fuel to the carburetor, a fuel shut-off valve is provided and is located at the center underside of the fuel tank.
PROOF-METER
The Ford Tractor Proof-Meter, conveniently located at the top center of the instrument panel, is actually five instruments in one. The separate functions of the Proof-Meter are described in the following paragraphs.
Engine Speed: Engine revolutions per minute, from 0 to 2400 rpm, are shown on the outer band of the Proof-Meter. Knowing the correct engine speed is helpful in checking correct oil pressure and maintaining the proper engine idle speed.

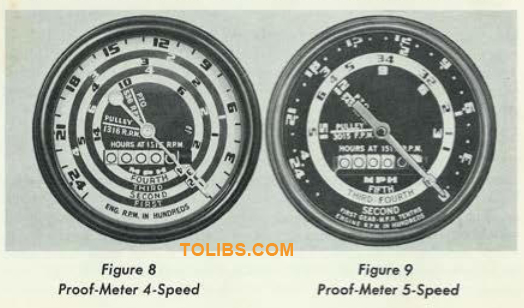
Tractor Ground Speed: The ground speed (mph) on tractors with 4-speed transmissions, is tcad in the band directly under the gear number On the pointer, as shown in Figure 8. On tractors with 5-speed transmissions, the speed is read in the same manner except in third and fourth gear, where the respective speeds are indicated in different colors. See Figure 9. On Select-O-Speed Transmission equipped tractors, the ground speed is given in 10th gear only and is read on the inner band of figures, as shown in Figure 10.
P.T.O. Speed: The American Society of Agricultural Engineers (A.S.A.E.) standards for P.T.O. speed are 540 and 1000 rpm. The standard P.T.O. speed is shown on the 4-speed Proof-Meter at 1485 engine rpm and on the 5-speed and Seicct-O-Speed Proof-Meter at 1750 engine rpm. Most P.T.O. implements will operate at maximum efficiency when the Proof-Meter pointer is held at this speed. The 1000 rpm P.T.O. is available only on the Model 41207 tractor. For further information on the P.T.O., refer to page 27 of this manual.
Belt Pulley: For best performance, most stationary machinery must be operated at the correct belt speed. The A.S.A.E. has established a standard range for belt speeds of from 3000 to 3200 fpm. A belt speed within this range is reached with a standard nine inch belt pulley when the Proof-Meter indicates 1950 engine rpm for the 4-speed transmission equipped tractor and 2200 engine rpm for the 5-speed and Sclect-OSpeed Transmission-equipped tractors. The belt speed is dependent on the size of the belt pulley and the pulley rpm. For further information on pulley sizes and belt speeds, consult the chart on page 32.
CAUTION: Do not operate the belt pulley with the engine P.T.O, speed shift lever in the 1000 rpm position on Select-O-Speed Transmission-equipped tractors.
Engine Hours: The hour meter portion of the Proof-Meter represents the hours your tractor engine has "worked", based on an average engine speed of 1515 rpm. Engine speeds below 1515 rpm accumulate hours more slowly than clock hours. Use this feature of the Proof-Meter to determine when service and maintenance are necessary. It will help you cut operating costs and prolong the life of your new tractor.
OPERATION
Your new Ford Tractor has been built with the knowledge gained through manufacturing over a million farm tractors. In it you will find many new and exclusive features, designed to make your w'ork easier, faster and more profitable. After familiarizing yourself with the tractor controls and instruments, read the following instructions on OPERATION. They will help you obtain maximum efficiency and dependable operation from your new Ford Tractor.
PRESTARTING CHECK
Your Forel Tractor and Implement Dealer has checked your tractor thoroughly. Wc suggest, however, that you double check the tractor before placing it in operation. Make certain that the crankcase, transmission, hydraulic system, and rear axle lubricants are to the recommended level. Check the tires for proper air pressure and be sure that the radiator is filled with coolant.
FUEL
- Gasoline Engines: Ford gasoline engines are designed to operate most efficiently with the anti-knock qualities in good regular grade gasoline. The use of poor quality fuel can cause knocking, overheating, vapor Lock, and engine failure.
- Diesel Engines: Above 20° F. normally use Diesel Fuel Oil No. 2 (No. 2D) with a minimum cetane rating of 45. In cold weather, below 20* F., use Diesel Fuel Oil No. I (No. 1D) with a minimum cetane rating of 50.
BREAK-IN PROCEDURE
Yout new Ford Tractor should provide long and dependable service if given a good start by you, the operator. During the first 50 hours of operation, do not work the tractor at full capacity and avoid prolonged idling. Run the engine at medium speeds and use the lower gears wher ever possible. Check rhe instruments frequently. Keep the radiator and oil reservoirs filled to the recommended level.
After 50 hours of operation, see your Ford Tractor and Implement Dealer, lie will perform all necessary checks and adjustments in the "50 HOUR SERVICE AND INSPECTION," authorized by your Service Policy,
4-SPEED AND 5-SPEED TRANSMISSION TRACTORS - GASOLINE ENGINE
Starting the Engine: To start the engine under normal weather conditions, move the throttle [ever to approximately open position, set the gear shift lever in neutral and turn the ignition key clockwise. Then, simply depress the clutch pedal and press the starter.
Initial starting of the engine may require the use of the choke. Under these conditions, pull out the choke control and depress the starter button at the same time. As soon as the engine starts, push the choke in to its normal operating position. Immediately check the engine oil pressure, then run the engine at about I(MIO rpm until it warms up. A faster warm-up can be achieved if the tractor is placed under light load.
Driving the Tractor: Release both rear wheel brake locks and depress the clutch pedal, Next, move rhe gearshift lever to the desired gear. The shift positions are clearly indicated on the transmission covet and are shown in Figure 3.
You will save fuel and minimize engine wear by selecting the correct gear ratio for a particular operation. Operating the tractor in low gear with a light load and high engine speed will waste fuel. Too high a gear selection may cause harmful engine lugging, Lugging occurs when the load for a particular gear and throttle setting is excessive. It can be recognized when the engine will not respond to a throttle increase under load.
After shifting to the desired gear, increase the engine speed slightly and release the clutch pedal slowly and steadily. When the tractor is in morion, remove your foot from the clutch pedal and increase the ground speed as desired, with the throttle.
NOTE: DO NOT ATTEMPT TO SHUT GEARS WHILE THE TRACTOR IS IN MOTION.
Stopping the Tractor: To stop the tractor, decrease the engine speed and depress rhe clutch pedal. Apply pressure evenly to both brake pedals until the tractor is stopped. Then, place the gearshift lever in the neutral position, tock the brakes and turn the key switch off. If the engine is hot, let >t idle for a few seconds before turning the key off.
Towing the Tractor: Do not tow the tractor faster than 20 mph.
Reversing Transmission: This auxiliary transmission is available as an accessory for use with the 4-speed transmission for fast forward and reverse shifting, such as shuttle operations. This transmission cuts cycle time and adds to the operator's productivity, since it is not necessary to shift the tractor transmission after the desired gear ratio is selected. The operator can change directions quickly and also have the same speed range in reverse that the tractor provides in forward gears.
The reversing transmission is operated in any selected forward gear by depressing the clutch pedal and placing rhe reversing transmission shift lever in the forward position for forward operation or to the rear for hacking up. The tractor motion must be stopped and the clutch pedal depressed when the gears are shifted,
Over-Under Transmission: The over-under transmission is available as a factory installed option. This transmission is desirable where a wide variety of gear ratios are necessary. There are twelve forward speeds and three reverse speeds available with the over-under transmission. A ground speed of approximately 23 mph at full throttle can be reached in over drive 4th gear for highway driving, or a low speed gear ratio of 16.5 mph can be used for hard pulling.
To operate the over-under transmission, depress the clutch pedal, select the desired 4-speed gear ratio, and move the Over-under lever:
- forward for under drive.
- in the middle far neutral
- to the left from neutral and back for standard drive, straight back from neutral for over drive.
The 4-speed gear ratios and ground speeds are listed in the "SPECIFICATIONS'1 section of this manual. Conversion figures are also provided for the over-under ranges.
SELECT-O-SPEED TRANSMISSION TRACTOR - GASOLINE ENGINE
Storting the Engine: Place the transmission selector lever in park (P) position, depress the inching pedal, and turn the key switch to the "ON" position. Move the throttle lever to approximately 1/^ open position and press the starter button. Lise the choke control as required. Operate the engine at approximately 100b rpm to sufficiently warm both the engine and transmission oil before subjecting the tractor to a load.
Driving the Tractor: With the engine running and the inching pedal depressed, shift directly to the desired gear if the operation is anticipated to be in the low gear ratios (1 through 4). Shift to one gear below the anticipated operating gear for the higher gear ratios, Increase the throttle setting to handle the initial load, then let the inching pedal up slowly until the tractor moves off smoothly. Shift on-the-go to the gear ratio which will permit the best performance and move the throttle to the desired setting.
You will save fuel and minimize engine wear by selecting the correct gear ratio for a particular operation. Operating the tractor in low gear with a light load and high engine speed will waste fuel, Operating in too high a gear may cause harmfill engine lugging. Lugging occurs when the load for a particular gear and throttle setting is excessive. It can be recognized when the engine will not respond to a throttle increase under load.