1983 Mazda RX7 Factory Service Manual
1983 CRUISE CONTROL SYSTEMS Mazda
Main switch is used to turn system on and off. A control switch with "SET (ACCEL)" and "COAST (RESUME)" is used to set desired speed. System will not operate at speeds under 25 MPH. Main switch is located on the right side of dash. Control switch is on right side of steering column.
OPERATION
MAIN SWITCH
Pressing the main switch activates the cruise control.
CONTROL SWITCH
When "SET" switch is pressed and then released, desired speed is set. If switch is continuously pressed, the vehicle will accelerate until switch is released, at which time the new or higher speed will be set. When "COAST" switch is moved down or rearward, speed will be reduced. When switch is released, the new or lower speed will be set.If cruise control is overridden by means other than the main switch,original speed can be resumed by operating switch forward or up.
TROUBLE SHOOTING
CRUISE CONTROL SYSTEM DOES NOT WORK
Blown fuse. Faulty main switch, control switch, speed sensor or actuator. Malfunction of stop, clutch or inhibitor switch. Bad ground or wiring.
SPEED SETTING CAN'T BE CANCELED
Faulty control unit. Malfunction of clutch, stop or inhibitor switch.
SET SPEED IS NOT HELD
Faulty actuator, control unit or speed sensor. Actuator control cable malfunction.
SYSTEM DOESN'T ENGAGE IMMEDIATELY
Faulty actuator, control switch or unit. Actuator control cable malfunction.
TESTING
- Support vehicle with drive wheels off of ground. Turn ignition switch ON. With control unit connected, connect negative probe of voltmeter to terminal M of control unit connector. Refer to CRUISE CONTROL UNIT CONNECTOR DIAGRAM. Test terminals D through N. See CRUISE CONTROL UNIT TESTINGtable. If values do not match those specified, check appropriate circuits. If values do match those specified, go to next step.
- Start engine and switch cruise control main switch ON. Increase speed until 30 MPH is indicated and push cruise control SET button. Connect negative probe of voltmeter to terminal M of control unit connector. Test terminals A through C. See CRUISE CONTROL UNIT TESTINGtable. If values do not match those specified, check appropriate circuits.
DESCRIPTION & OPERATION
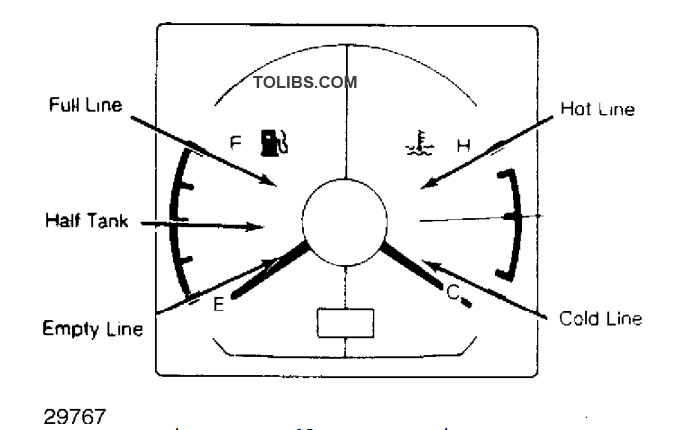
All models have a steering column mounted combination switchto control turn signals, headlights and wipers. The instrumentcluster contains a speedometer, fuel gauge and water temperature gauge. Some models also have a tachometer, voltmeter and oilpressure gauge. The fuel and temperature gauges operate on 7 volts,supplied by a cluster-mounted voltage regulator. The sending unitsare variable-resistance type and have the same resistance values on all models.
GAUGES
- Turn ignition on. If gauge needles do not move at all,check for blown fuse or broken power wire. If both gauges areinoperative, voltage regulator may be the cause. If only one gaugedoes not work, the gauge, sending unit, or connecting wiring may beat fault.
- To test temperature gauge, disconnect sending unit wire.Connect a resistor between wire and ground, then check gauge reading.Change resistance and recheck. If gauge readings are as shown intables, replace sending unit. If not, repair wiring or replace gauge.
- To test fuel gauge, disconnect wire to sending unit atfuel tank (all except GLC Wagon) or unplug connector behind left kick panel (GLC Wagon). Connect resistor between Yellow wire and ground.Check gauge reading. NOTE: Allow 2 minutes for gauge reading to stabilize. It should be within 1 pointer width of line on gauge face.
- If gauge readings are incorrect, replace gauge. Ifreadings are okay, test in-tank sending unit before replacing it.Resistance should measure 0-5 ohms with float raised, and 103-117ohms with float lowered. If not, replace sending unit.
REMOVAL & INSTALLATION INSTRUMENT CLUSTER
Removal (GLC Hatchback)
Disconnect battery ground. Remove steering wheel. Removemeter hood by moving it up and down with hands. Disconnect speedometer cable and remove 4 cluster screws. Pull cluster back and unplug wiring.
Installation
To install, reverse removal procedure.
Removal (GLC Wagon)
- Disconnect battery ground. Place a strip of masking tape along edge of instrument panel under cluster to protect finish. Remove 2 screws and meter hood.
- Remove 1 screw at left end of center panel, then unsnap panel. Remove 3 screws under edge of dashboard cover and removecover. Remove 3 cluster screws, disconnect speedometer cable andwires and remove cluster.
Installation
To install, reverse removal procedure.
Removal (Pickups & 626)
Disconnect battery ground. Remove steering wheel and column cover. Disconnect speedometer cable. Remove cluster hood and mounting bolts. Pull cluster back, unplug wiring and remove cluster.
Installation
To install, reverse removal procedure.
Removal (RX7)
Disconnect battery ground. Remove steering wheel. Remove 2 screws and cluster cover. Remove cluster attaching screws. Disconnect speedometer cable and pull cluster back. Unplug wiring and remove cluster.
COMBINATION SWITCH
Removal
Disconnect battery ground. Remove steering wheel. Remove column covers and snap ring at top of column (if equipped). Unplug wiring connectors. Loosen combination switch screw. Remove switch.
Installation
To install, reverse removal procedure.
1983 Wiper/Washer Systems MAZDA
All models have a 2-speed wiper motor with intermittent wipe feature. GLC and RX7 models may be equipped with a rear window wiper/washer system. The wiper switch for GLC Wagon is a lever on the left side of the steering column. On all other models wiper lever is on the right side ofcolumn. A time delay relay is used to control the intermittent cycleon all except RX7 models. On RX7, wipers are timed by the "Control Processing Unit" that also operates a number of other accessories.
GLC WAGON
The wiper speeds are controlled by twisting the lever to the left of the steering column. The washer is operated by pressing in onthe end of the lever. The rear wiper on GLC Wagon is turned on bypulling out the dash-mounted switch, while the washer operates when the switch is turned.
ALL OTHER MODELS
The wipers are controlled by a lever on the right side ofthe steering column. As the lever is moved down, it switches thewipers to intermittent, low speed and high speed. If the lever ispulled toward the steering wheel, the washer sprays. If the lever is pushed away from the steering wheel, thewipers sweep until it is released. The rear wiper/washer on GLCHatchback is controlled by a rocker switch on the instrument panel. The RX7 rear wiper switch is on the console.
TESTING WIPER MOTOR
- Remove wiper motor from vehicle. Connect jumper wires to connector at motor to check both speeds. For low speed, connectbattery voltage to Blue wire terminal and ground the Blue/Whiteterminal. For high speed, ground the Blue/Red terminal instead.
- To check the park switch, apply battery voltage to theBlue wire terminal. Connect a jumper wire between Blue/White and Blue/Black. Ground the Black wire. Motor should run briefly and stop.
FRONT WIPER MOTOR ASSEMBLY
Removal
1) Run wipers until they are in vertical position, then turn ignition off or disconnect battery cable. Remove wiper arms and shaft nuts.
2) Remove cowl grille or access panel. Unplug at motor.Remove mounting bolts and wiper motor.
REAR WIPER MOTOR ASSEMBLY
Removal
Disconnect battery ground. Remove wiper arm and shaft nuts.Remove trim on rear hatch. Remove fasteners and remove wiper holecover. Disconnect wiring, remove attaching bolts and remove rearwiper motor.
WIPER SWITCH
Removal
Disconnect battery ground. Remove steering wheel. Removecolumn covers and snap ring at top of column (if equipped). Unplugwiring connectors. Loosen combination switch screw. Removecombination switch.