Mazda 2 J64J Diagnostic Trouble Codes
ON-BOARD DIAGNOSTIC [ADVANCED KEYLESS AND START SYSTEM]
DTC U0401:68 [ADVANCED KEYLESS AND START SYSTEM]..09-02A-34
- Detection Conditio..09-02A-34
- Possible Causes..09-02A-34
- Diagnostic Procedure..09-02A-34
DTC U201F:00 [ADVANCED KEYLESS AND START SYSTEM]...09-02A-34
- Detection Conditio...09-02A-34
- Possible Causes...09-02A-34
- System Wiring Diagra...09-02A-35
- Diagnostic Procedure...09-02A-35
FOREWORD [ADVANCED KEYLESS AND START SYSTEM]
- The OBD (on-board diagnostic) system has the following functions:
- Malfunction detection function: Detects malfunctions in the advanced keyless and start system and outputs DTCs.
- PID/data monitor function: Reads out specific input/output signals and the system status.
- Diagnostic DTCs can be read/cleared using the M-MDS.
DTC INSPECTION [ADVANCED KEYLESS AND START SYSTEM]
- Connect the M-MDS to the DLC-2.
- After the vehicle is identified, select the following items from the initialization screen of the M-MDS.
- When using the IDS (laptop PC)
- Select “Self Test”.
- Select “Modules”.
- Select “RKE”.
- When using the PDS (Pocket PC)
- Select “Module Tests”.
- Select “RKE”.
- Select “Self Test”.
- When using the IDS (laptop PC)
- Verify the DTC according to the directions on the screen
- If any DTCs are displayed, perform troubleshooting according to the corresponding DTC inspection.
- After completion of repairs, clear all DTCs stored in the keyless control module. (See 09-02A-5 CLEARING DTC [ADVANCED KEYLESS AND START SYSTEM].)
| DTC M-MDS display | Detection condition | Reference |
| B1026:51 | Steering lock unit not programmed | See 09-02A-9 DTC B1026:51 |
| B1026:87 | Communication error between keyless control module and steering lock unit | See 09-02A-9 DTC B1026:87 |
| B1026:96 | Steering lock unit status malfunction signal detected | See 09-02A-11 DTC B1026:96 |
| B102B:51 | No advanced key programming record (programming never performed in past) | See 09-02A-11 DTC B102B:51 |
Possible Causes
- Steering lock unit connector or terminals malfunction
- Keyless control module connector or terminals malfunction
- Open or short circuit in wiring harness between steering lock unit and keyless control module
- Steering lock unit malfunction
- Keyless control module malfunction
INSPECT STEERING LOCK UNIT CONNECTOR
- Turn the ignition switch to the LOCK position.
- Disconnect the negative battery cable.
- Disconnect the steering lock unit connector.
- Inspect the steering lock unit connector. (Corrosion, damage, and disconnected pins)
- Are the connector and terminals normal?
INSPECT KEYLESS CONTROL MODULE CONNECTOR
- Disconnect the keyless control module connector.
- Inspect the keyless control module connector. (Corrosion, damage, and disconnected pins)
- Are the connector and terminals normal?
INSPECT WIRING HARNESS BETWEEN STEERING LOCK UNIT AND KEYLESS CONTROL MODULE
- Inspect the wiring harness between keyless control module terminal 2L and steering lock unit terminal G for the following:
- Short to ground
- Short to power supply
- Open circuit
- Is the wiring harness normal?
WINDSHIELD WASHER NOZZLE REMOVAL/INSTALLATION
- Remove the windshield wiper arm. (See 09-19-7 WINDSHIELD WIPER ARM AND BLADE REMOVAL/INSTALLATION.)
- Remove the cowl grille. (See 09-16-5 COWL GRILLE REMOVAL/INSTALLATION.)
- Remove the windshield washer hose from the windshield washer nozzle.
- Press the windshield washer nozzle tab in the direction of the arrow shown in the figure to detach it.
- Pull out the windshield washer nozzle from the cowl grille and remove.
- Install in the reverse order of removal.
WINDSHIELD WASHER NOZZLE ADJUSTMENT
Insert a tape-wrapped flathead screwdriver into the windshield washer nozzle and adjust the area washer fluid is sprayed as shown in the figure.
WINDSHIELD WASHER HOSE REMOVAL/INSTALLATION
- Remove the mudguard on the left side. (See 09-16-8 MUDGUARD REMOVAL/INSTALLATION.)
- Remove windshield washer hose No.1 from the washer tank.
- Detach clip A.
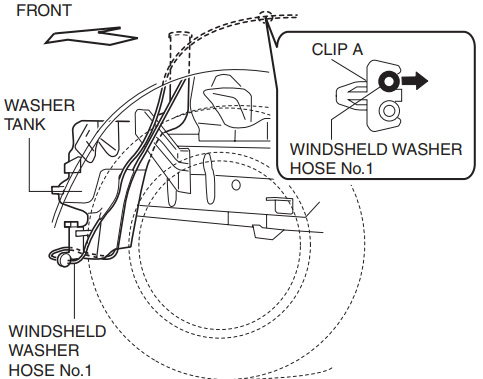
- Remove windshield washer hose No.1 from clip B and joint pipe A in the direction of the arrow shown in the figure.
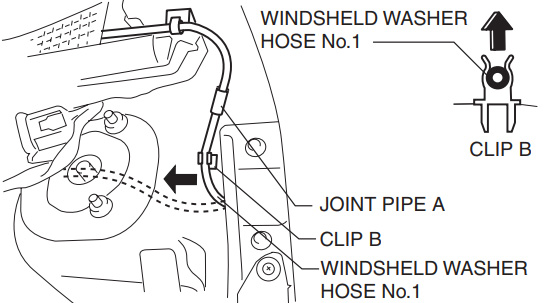
- Remove the windshield washer base No.1 from joint pipe A.
- Remove windshield washer hose No.1 from joint pipe A.
- Remove the cowl grille. (See 09-16-5 COWL GRILLE REMOVAL/INSTALLATION.)
- Remove the windshield wiper arm. (See 09-19-7 WINDSHIELD WIPER ARM AND BLADE REMOVAL/INSTALLATION.)
- Remove the windshield washer nozzle. (See 09-19-15 WINDSHIELD WASHER NOZZLE REMOVAL/INSTALLATION.)
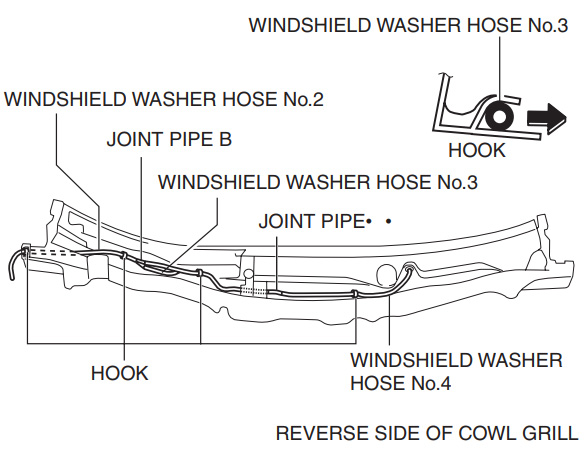
- Remove the windshield washer hose from the hook.
- Remove windshield washer hoses No.2, No.3 and No.4 from joint pipes B and C.
- Install in the reverse order of removal.