Mazda CX-9 Grand Touring Workshop Manual

ACCESSORIES & BODY, CAB Body Panels - Mazda CX-9
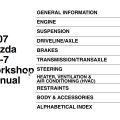
REAR BUMPER REINFORCEMENT REMOVAL/INSTALLATION
- Disconnect the negative battery cable.
- Remove the rear combination light. (See REAR COMBINATION LIGHT REMOVAL/INSTALLATION .)
- Remove the rear bumper. (See REAR BUMPER REMOVAL/INSTALLATION.)
- Remove the fasteners, then remove the energy-absorbing foam.
- Remove the bolts and nuts, then remove the rear bumper reinforcement.
- Install in the reverse order of removal
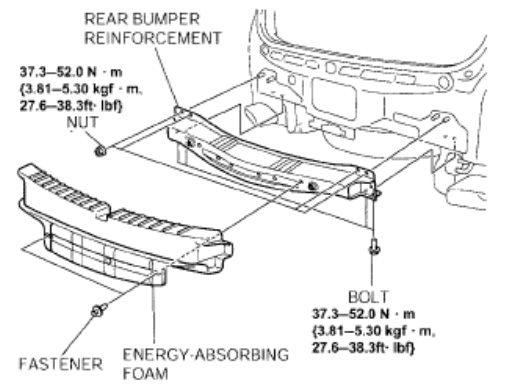
BODY PANELS LOCATION INDEX
- Shroud panel: See 09-10-12 SHROUD PANEL REMOVAL/INSTALLATION
- Cowl panel: See 09-10-13 COEL OANEL REMOVAL/INSTALLATION
- Hood: See 09-10-3 HOOD REMOVAL/INSTALLATION and See 09-10-4 HOOD ADJUSTEMNT
- Front bumper reinforcement: See 09-10-9 FRONT BUMPER REINFORCEMENT/REMOVAL/INSTALLATION
- Front bumper: See 09-10-8 FRONT BUMPER REMOVAL/INSTALLATION and See 09-10-8 FRONT BUMPER DISASSEMBLY/ASSEMBLY
- Front fender panel: See 09-10-12 FRONT FENDER PANEL REMOVAL/INSTALLATION
- Rear bumper: See 09-10-9 REAR BUMPER REMOVAL/INSTALLATION
- Rear bumper reinforcement: See 09-10-1 REAR REINFORCEMENT DISASSEMBLY/ASSEMBLY
- Fuel-filler lid: See 09-10-6 FUEL-FILLER LID REMOVAL/INSTALLATION
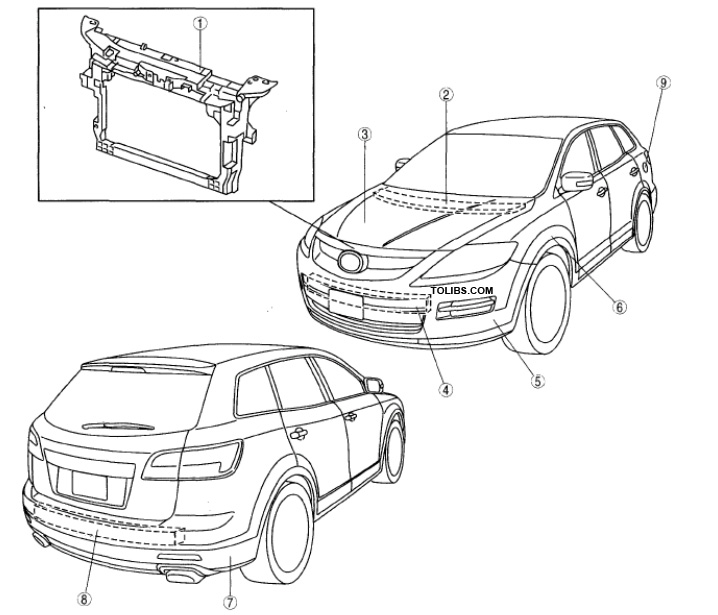
HOOD REMOVAL/INSTALLATION
- Disconnect the negative battery cable.
- To remove the hood hinges, remove the following parts:
- Windshield wiper arm and blade (See WINDSHIELD WIPER ARM AND BLADE REMOVAL/INSTALLATION )
- Side cowl grille (See COWL GRILLE REMOVAL/INSTALLATION )
- Remove in the order indicated in the table.
- Install in the reverse order of removal.
- Adjust the hood. (See HOOD ADJUSTMENT.)
Identifying Hood Removing Components & Torque Specifications
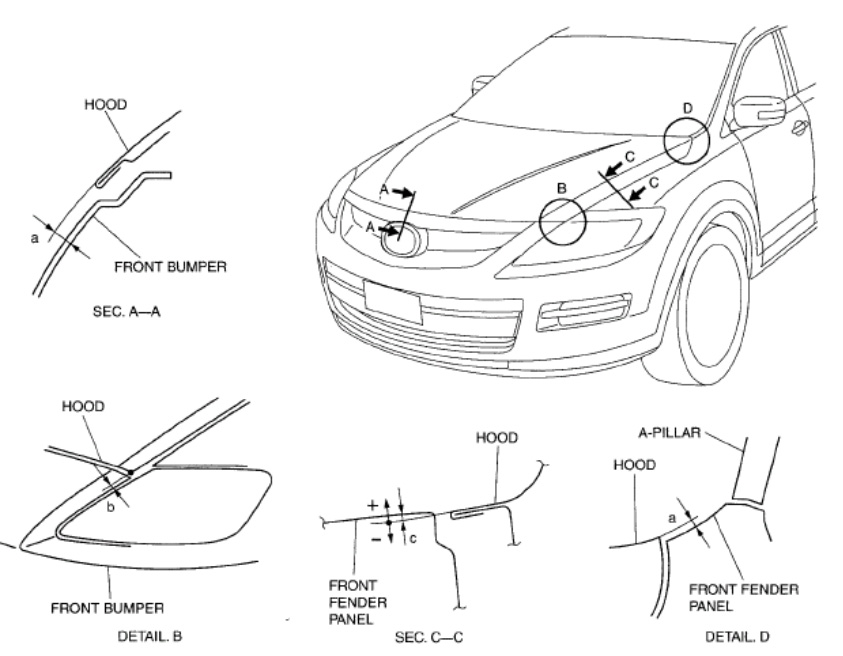
HOOD ADJUSTMENT
GAP ADJUSTMENT
Standard clearance
a: -1.5-1.5 mm {-0.05-0.05 in}
b: 0.73-4.33 mm {0.03-0.17 in}
c: -1.2-1.2 mm {-0.04-0.04 in}
- Measure the gap between the hood and body.
- Disconnect the negative battery cable.
- Remove the following parts:
- Windshield wiper arm and blade (See WINDSHIELD WIPER ARM AND BLADE REMOVAL/INSTALLATION )
- Cowl grille (See COWL GRILLE REMOVAL/INSTALLATION )
- Loosen the hood hinge installation bolts and adjust the hood.
- Tighten the bolts.
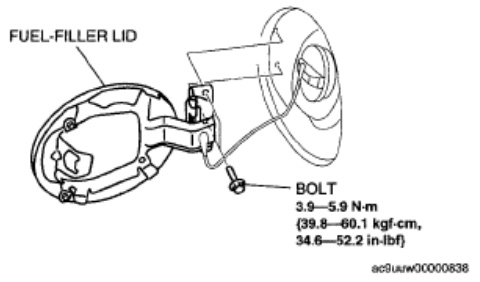
FUEL-FILLER LID REMOVAL/INSTALLATION
- Remove the bolts.
- Remove the fuel-filler lid
- Install in the reverse order of removal.
- Adjust the fuel-filler lid. (See FUEL-FILLER LID ADJUSTMENT.)
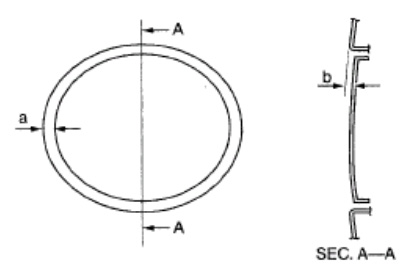
FUEL-FILLER LID ADJUSTMENT
- Measure the gap and height difference between the fuel-filler lid and the body.
- Loosen the fuel-filler lid installation bolts and adjust the fuel-filler lid.
- Clearance:
- a: 1.7-3.7 mm {0.07-0.14 in}
- b:-0.5-1.5 mm {-0.01-0.05 in}
- Clearance:
- Tighten the bolts.
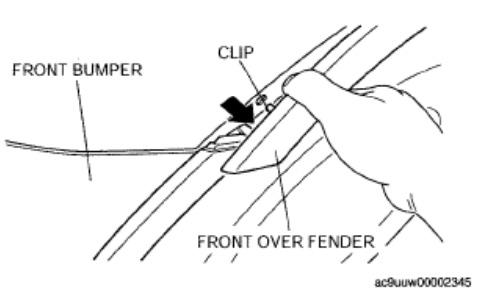
FRONT BUMPER REMOVAL/INSTALLATION
- Disconnect the negative battery cable.
- Remove the clip of the front over fender and put aside the front bumper.
- Remove in the order indicated in the table.
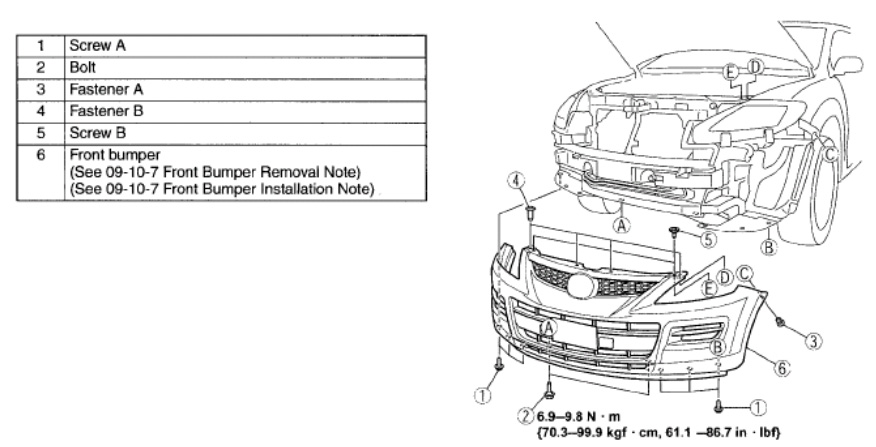
- Disconnect the front fog light connector. (Vehicles with front fog lights)
- Install in the reverse order of removal.
- Adjust the front fog light aiming for vehicles with front fog lights. (See FRONT FOG LIGHT AIMING .)
FRONT BUMPER REMOVAL NOTE
- Pull the front bumper ends (wheel arch) outward (1) to disengage from the bumper slider.
- CAUTION: When disengaging the front bumper from the bumper slider, the front bumper could fall and be damaged. Secure the front bumper so that it does not fall.
- Remove the front bumper from the body.
FRONT BUMPER INSTALLATION NOTE
- Spread the front bumper ends apart.
- Assemble the front bumper to the body.
- Press the front bumper connecting area into the body to engage with the bumper slider.
FRONT BUMPER DISASSEMBLY/ASSEMBLY
- Remove the front fog light. (Vehicles with front fog lights) (See FRONT FOG LIGHT REMOVAL/INSTALLATION .)
- Remove the radiator grille. (See RADIATOR GRILLE REMOVAL/INSTALLATION .)
- Disassemble in the order indicated in the table.
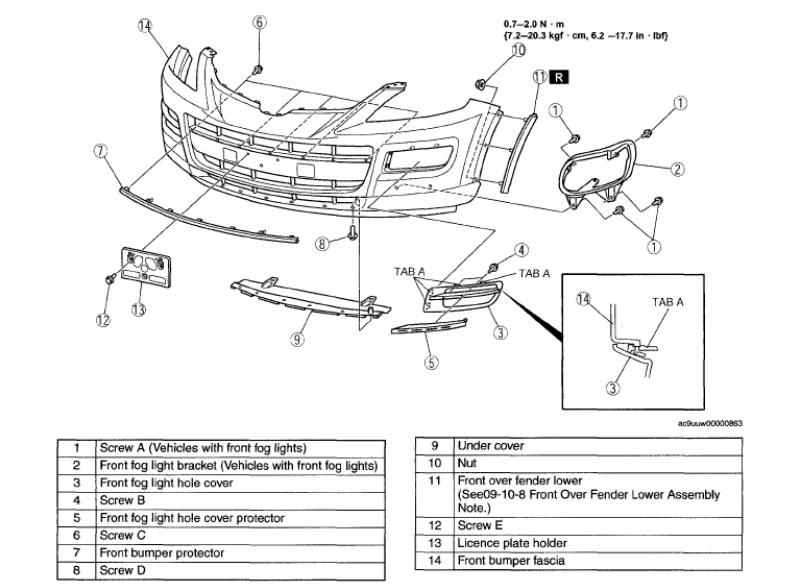
- Assemble in the reverse order of disassembly.