WiFi Smart Thermostat RTH9580WF1005/U1 User Guide
WiFi Smart Thermostat RTH9580WF1005/U1 Quick Start Guide and Installation Manual
Mount wallplate for smart thermostat
Mount your new wallplate using screws and anchors included with the thermostat.
If necessary:
- Drill 4.5mm holes for drywall
- Drill 5.5mm holes for plaster
Note: You may be able to use your existing wall anchors. Hold the wallplate up to the existing anchors to check for alignment.
Switch OFF power to your heating/cooling system
Important! To protect your equipment, switch OFF the power to your heating/cooling system at the breaker box or the system switch. Confirm power is OFF.
Try to turn on heating/cooling equipment by changing temperature on your old thermostat. Your power is OFF if your system does not turn ON.
Remove old thermostat faceplate and leave wires connected
Take a picture of the wire connections for later reference. If no wire is connected to a terminal labelled C or no C terminal exists on the old thermostat, view the Alternate Wiring videos honeywellhome.com/wifi-thermostat.
Important! C wire is required and is the power source for your thermostat. Without a C wire, your thermostat will not power up.
WiFi Smart Thermostat Label wires
Do not label by wire colour. Use the supplied sticky tags to label each wire as you disconnect it. Label wires according to old thermostat terminal designations, not by wire colour.
Note: If no tag matches a terminal designation, write the appropriate letter on a blank sticky tag. Wrap the wires around a pencil to prevent them from falling back into the wall.
WiFi Smart Thermostat Remove wallplate
Remove the old wallplate from the wall after all wires are labelled and disconnected.
Register online for remote access
To register your thermostat, follow the instructions on Step 3.1.
Note: The Register Online screen remains active until you complete registration and/or touch Done. If you touch Done before you register online, your home screen displays an orange alert button telling you to register. Touching that button displays registration information and an option to snooze the task. To view and set your smart thermostat remotely, you must have a Total Connect Comfort account.
Select setup
Before connecting to your Wi-Fi network, you need to set initial thermostat options to define your heating/cooling system:
- Language
- Home or business
Follow prompts on the screen to select appropriate options.
- Touch the language you want the thermostat to display, then touch Next.
- Select Home or Business application, then touch Next.
- Touch Next or name the thermostat location—touch THERMOSTAT and follow the rest of the instructions.
- Select what your thermostat will control and touch Next.
- Select your system type and touch Next The system type determines other selection for completing initial setup. Use the checklist from Step 1.6 when making selections.
- Touch Next after making selections on each screen.
- Touch Done on the last screen. The thermostat displays an option to connect to your Wi-Fi network.
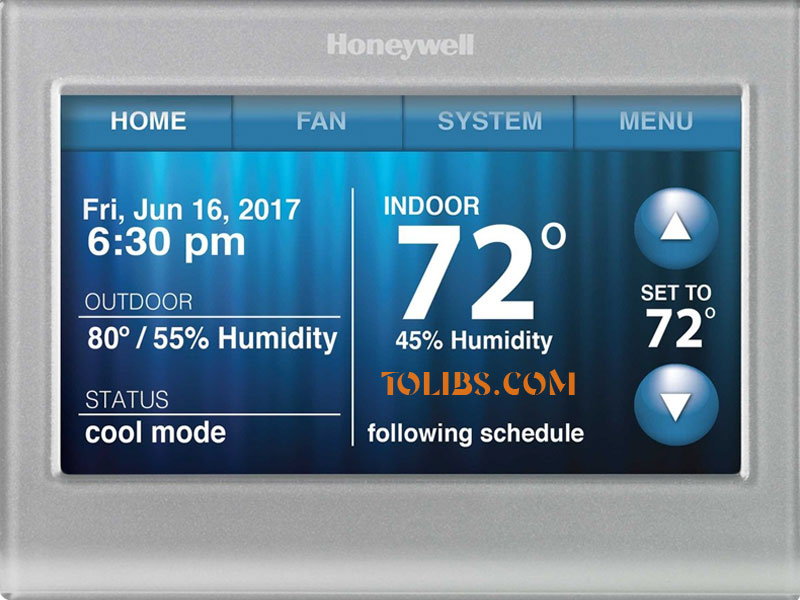
Connect to your Wi-Fi network
After touching Done on the final screen of the initial set up (Step 1.9g), the thermostat displays an option to connect to your Wi-Fi network.
Touch Yes to connect the thermostat to your Wi-Fi network. The screen displays the message “Searching for wireless networks. Please wait...” after which it displays a list of all Wi-Fi networks it can find.
Note: If you cannot complete this step now, touch I’ll do it later. The thermostat will display the home screen. Complete this process by selecting MENU > Wi-Fi Setup. Continue with Step 2.1b.