1995 Mazda MX-3 Workshop Repair Manual
Mazda MX-3 Workshop Manual
For proper repairandmaintenance,athorough familiarization with this manual is important, and it should always be kept in a handy place for quick and easy reference. All the contents of this manual, including drawings and specifications, are the latest available at the time of printing. As modifications affecting repair or maintenance occur, relevant information supplementary to this volume will be made available at Mazda dealers. This manual should be kept up-to date.
SCHEDULED MAINTENANCE
SCHEDULED MAINTENANCE TABLE (EXCEPT CANADA)
Schedule 1 (Normal driving conditions)
The vehicle is mainly operated where none of the "unique driving conditions” apply.
Schedule 2 (Unique driving conditions)
- Repeated short-distanoe driving.
- Driving in dusty conditions.
- Driving with extended use of brakes.
- Driving in areas where road salt or other corrosive materials are used.
- Driving onrough or muddy roads.
- Extended periods of idling or low-speed operation.
- Driving for tong prolonged periods in cold temperatures or extremely humid climates.
COMPRESSION
If the engine exhibits low power, poor fuel economy, or poor idle, check the following:
- Ignition system (Refer to section G.)
- Compression (Refer to below.)
- Fuel system (Refer to section F2.)
PREPARATION SST

INSPECTION
- Verify that the battery is fully charged.Rechargeit if necessary.
- Warm up the engine to the normal operating temperature.
- Stop the engine and allow it to cool for about 10 minutes.
- Remove the all spark plugs.
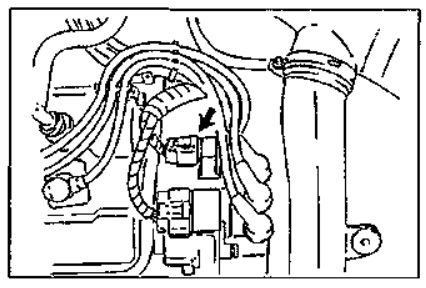
- Disconnect the distributor connector.
- Install SST into the No.1 spark plug hole.
- Fully depress the accelerator pedal and crank the engine.
- Note the maximum gauge reading.
- Check each cylinder as above.
| Standard | 1,334 (13.6,193)-300 |
| Minimum | 981 {10.0,142}-300 |
| Maximum difference between cylinders | 196 {2.0, 28} |
If the compression in one or morecylinders is low, pour a small amount of clean engine oil into the cylinder and recheck the compression,
- If the compression in creases,the piston,piston rings, or cylinder wall may be worn.
- If the compression stays low, the valve may be stuck or improperly seated.
- If th ecompression in adjacent cylinders stay slow,the cylinder head gasket maybe damaged or the cylinder head distorted.
CYLINDER HEAD GASKET Replacement
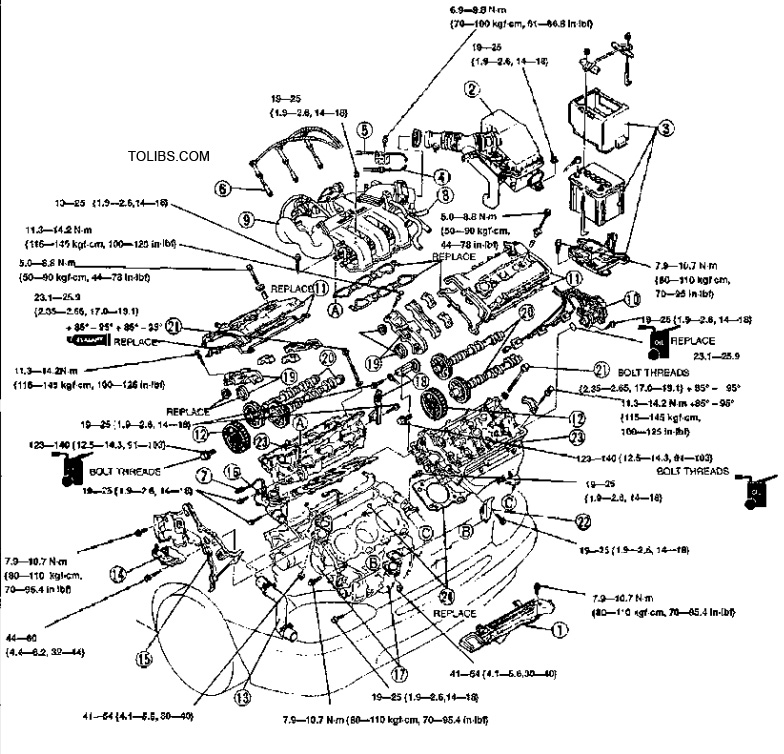
- Disconnect the negative battery cable.
- Drain the engine cooiant. (Refer to section E2.)
- Remove the timing belt. (Refer to page B2-12.)
- Remove in the order shown in the figure, referring to Removal Note.
- Install inthe reverse order of removal, referring to Installation Note.
ENGINE COOLANT
Refilling
Use the proper amount and mixture of ethylene-glycol based coolant (Refer to Coolant Protection, page E2-5.)
1.Slowly pour thecoolant into the radiator up to the coolant filler port.
2.Fill the coolant reservoir upto the FULL mark.
3.Fully install the coolant filler cap.
4.Start the engine and letit idle until It warms up.
5.If the temperature increases beyond normal, there is excessive air in the system. Stop the engine and allow it to cool: then repeat steps1-3.
6.Run the engine at 2,200-2,800 rpm for five minutes.
7.Stop the engine and allow it to cool.
8.Repeat steps 1-7, then go to step 9.
9.Remove the filler cap and verify that the engine coolant level is near the filler neck. If not, repeat steps 1-8.
10.Fill the reservoir up to the FULL mark
RADIATOR REMOVAL / INSTALLATION
1.Disconnect the negative battery cable.
2.Drainthe engine coolant. (Refer to page E2-6.)
3.Remove in the order shown in the figure.
4.Install in the reverse order of removal.
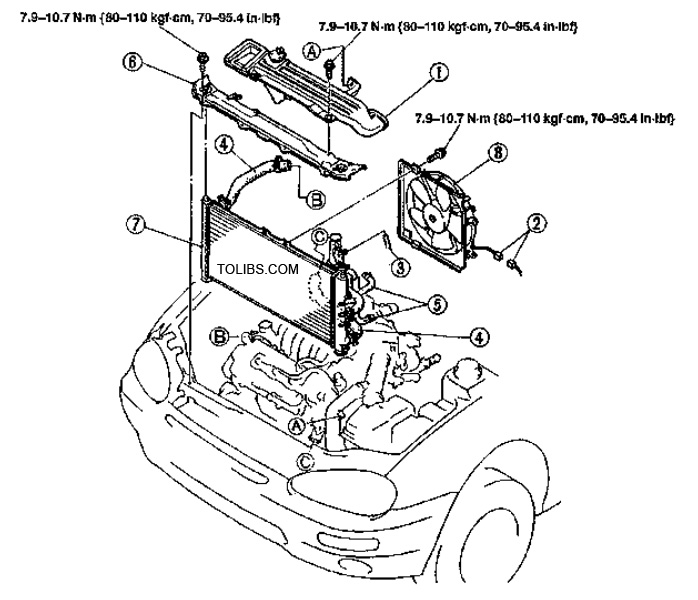
- Fresh-air duct
- Coolant fan connecter
- Coolant reservoir hose
- Upper and lower radiator hoses
- Oil cooler hoses (ATX)
- Shroud upper panel
- Radiator Inspection below
- Coolant fan and radiator cowling assembly
INSPECTION Radiator
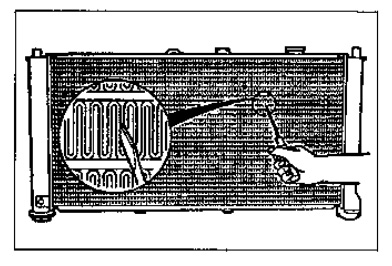
Check for the following and repair or replace if necessary.
- Cracks, damage, and water leakage.
- Bent fins (Repair with a screwdriver).
- Distorted or bent radiator inlet.
Steps After Installation
- Fill the radiator withthe specified amount and type of engine coolant. (Refer to page E2-6.)
- Connect the negative battery cable,
- Start the engine and check for leaks.
See Mazda MX-3 SELF-DIAGNOSTIC SYSTEM Document